|
RV Winterizing 101 By: Mark J. Polk
|
For the RVer in all of us, winter is a time for making decisions. Do we park the RV and prepare it for the harsh winter months ahead, or do we pack it up and flee due south? Many of these decisions are made for us, and don't require our input. What I mean is, if you already live in a warm climate then winter is not a big issue. If you can take time away from work and travel south in the winter the decision is made for you. If you have managed to save lots of money during your working years, and can afford to travel all year the decision is made. If the children are gone, and you still have money left, the decision is made. Unfortunately, for some of us, we don't live in a warm climate, we can't afford to take any more time off of work, we haven't saved a lot of money, and the kids are still here spending what money we did manage to put aside. So without much input from me, the decision to park the RV and prepare it for winter has already been made.
If the same decision was made for you, whether it's due to where you live, your job, how much discretionary money you have, or where your children currently reside, not all is lost. The big decision has already been made. We're going to park the RV for the winter. Parking the RV for winter will require some preventive measures so it will be ready to use next spring. You'll also be glad you did it when you don't have costly repair bills due to the damaging results of winter. Now the question is how do you prepare it for winter, and who will be doing it? If you're like me and you enjoy performing the routine maintenance on your RV, not to mention saving a few dollars, the “who” part is answered. As for the “how” part, I have taken a checklist from my
“Checklists for RVers” e-book that I feel is the easiest and most effective way to winterize and store your RV.
Before you get started there are a few items you will need to have:
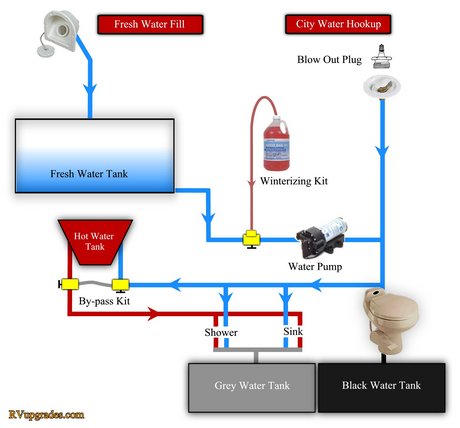
Now we can winterize the RV water system to protect it from freezing. Be sure to read your owners manuals for unit specific winterizing guidelines. Follow the steps below that apply to your RV.
- If you have any inline water filters remove and bypass before starting.
- Drain the fresh water holding tank.
- Drain and flush the gray and black holding tanks. Clean the black tank with a wand. Lubricate the termination valves.
- Drain the water heater. Open the pressure relief valve, remove drain plug. CAUTION (never drain when hot or under pressure).
- Flush water tank of any contaminants
- Open all hot and cold faucets; don't forget the toilet valve and outside shower.
- Locate and open low point drain lines. Using the water pump will help force water out, but turn it off as soon as the system is drained.
- Recap all drains and close all faucets.
- By-pass the water heater. If you do not have a by-pass kit installed the water heater will fill up with antifreeze before it goes through the water lines, wasting six or more gallons of antifreeze.
- Install a water pump converter kit, or disconnect the inlet side of the pump (the line coming from the fresh water holding tank) and connect tubing from the pump into a gallon of RV antifreeze
- Turn the water pump on and pressurize the system. Starting with the closest faucet slowly open the hot and then cold valves until antifreeze appears. Replace antifreeze jug as required.
- Repeat on all faucets from the closest to farthest away. Don't forget the outside shower.
- Flush the toilet until antifreeze appears.
- Turn the water pump off and open a faucet to release the pressure. Go to the city water inlet. Remove the small screen over the inlet and push in on the valve with a small screwdriver until you see antifreeze. Replace the screen.
- Pour a cupful of antifreeze down each drain. Pour a couple of cups in the toilet and flush into the holding tank.
- If your water heater has an electric heating element turn it off. This will protect the element if the unit is plugged in while being stored.
- Make sure all faucets are closed.
- Consult your owner manuals for winterizing icemakers and washing machines.
- The unit is winterized.
Now that the unit is winterized we will want to prepare the RV for storage. The storage procedures are divided into two sections, the coach storage and the chassis storage. Follow the steps below that apply: Part 1 (Coach Storage)
- Store your unit under a covered area if possible. If not, avoid parking under trees or in areas where grass and weeds will grow.
- If you choose to buy a cover for the RV, be sure it is made of a breathable material. This will help in preventing mold and mildew.
- Chock the wheels front and rear. Leave the parking brake off. If you're storing a Pop Up angle the tongue downward to assist in snow and water run off.
- Inflate the tires to the manufacturer's recommended max cold pressure. Cover the tires to protect them from the harmful ultraviolet rays. Place something between the tires and the ground.
- If you do not remove the tires for long-term storage periodically move the vehicle to prevent flat spots on the tires.
- Close all of the window blinds to avoid sun exposure to the carpet, drapes and upholstery.
- Wash the exterior of the unit and clean the interior thoroughly.
- Make sure the awning fabric is clean and dry before storing.
- On a Pop Up make absolutely sure the fabric is clean and dry before storing. This is a good time to check for tears, and repair the fabric.
- Inspect all roof seams, body seams and window sealant for cracks and openings. Consult your dealer for sealants compatible with these materials.
- Service all locks with a graphite spray lubricant. Lubricate all hinges and moving parts with WD 40.
- Turn all LP gas appliances off. Turn the LP gas supply valve off. If you're storing a Pop Up or Travel Trailer make sure the LP gas regulator is covered.
- Remove the fuse for the LP gas leak detector while the unit is in storage. This will prevent the batteries from discharging. Don't forget to replace it next spring.
- Insects are attracted to the odorant that is added to LP gas. To prevent mud dabbers and wasps from building nests in and around your gas appliances, cover the refrigerator vent, the furnace vent and the water heater vent.
- Inspect the underside of the unit thoroughly. Look for anywhere that mice or other rodents can get it, and seal as necessary.
- Strategically place mouse and ant traps in and around the unit. Avoid using mouse poison inside the RV.
- Remove all perishables and anything that can freeze.
- Leave doors, drawers and cabinets open.
- Remove all consumables that would attract mice and other rodents.
- Defrost the freezer compartment and clean the refrigerator. Leave the refrigerator doors open and place some baking soda inside to absorb odors.
- Clean the air conditioner filters, and cover the air conditioner.
- Turn off the main breaker and unplug all appliances.
- Remove dry cell batteries in clocks, flashlights and other items.
- The use of Maxx Air products will provide the airflow and ventilation required during storage while keeping the elements out.
Storing Your RV Part 2 (Chassis Storage)
- Check and fill the water levels in all batteries that are not maintenance free.
- Charge all batteries to a full charge. A discharged battery will freeze much quicker than a fully charged battery.
- Remove and clean all battery terminals and posts. Spray the terminals with terminal dressing to protect against corrosion.
- If you plan to start the unit while in storage, and to periodically plug the unit into shore power leave the batteries in the unit. Plugging it into shore power once a month for about eight hours will keep the coach batteries topped off.
- If you put the unit in long-term storage remove and store the batteries where they will not freeze. In either case keep the batteries charged.
- During short-term storage, start the unit monthly and run it with the dash air on for at least 30 minutes.
- If you don't plan on starting the unit, or won't be able to start it, buy some fogging oil from a marine supply store to protect the cylinder walls. When the unit is parked where it will be stored, spray the fogging oil into the engine intake downstream from the air filter with the engine at an idle. Complete the same steps on the generator. Follow the manufacturer's directions. DO NOT USE THIS PRODUCT IN A DIESEL ENGINE
- Fill the fuel tank prior to storage and add a fuel stabilizer. Run the engine and the generator long enough for the stabilizer to get through the system. Follow the manufacturer's directions.
- If the unit is not in long-term storage exercise the generator at least 2 hours each month. Run the generator at 1/2 rated power. Consult your generator set owners manual for rated loads.
- Change the oil and oil filter on the engine and the generator prior to storage. Acids accumulate in used oil and can corrode engine bearings.
- Check the engine radiator for the proper concentration of antifreeze. Consult your owner's manual for the correct type of engine antifreeze. Drain, flush and refill the system every 2 to 3 years.
- Drain the windshield washer reservoir or add the appropriate antifreeze solution to prevent it from freezing.
- Perform a full chassis lubrication prior to storage.
This completes the steps that are required to protect your investment when it's time to park it for the winter.
Happy camping,
Mark
Copyright 2006 by Mark J. Polk owner of RV Education 101
RV Expert Mark Polk, seen on TV, is the producer & host of America's most highly regarded series of DVD's, videos, books, and e-books.
http://www.rveducation101.com/
|